Creating users and groups
As root, run the following commands to create the Oracle user and groups:
# sudo -i
The below commands must be executed as root.
Add the groups required by Oracle.
Create the Oracle Inventory group:
# groupadd oinstall
Create the Oracle DBA group:
# groupadd dba
Create the home directory for the Oracle user:
# mkdir /home/oracle/
Create the directory for installing Oracle:
# mkdir -p /u01/app/oracle
Then create the Oracle user account that is a member of the dba group, has the /home/oracle/ home directory and uses /bin/bash as the default shell:
# useradd -g oinstall -G dba -d /home/oracle -s /bin/bash oracle
Set the password for the oracle user (don’t forget this password):
# passwd oracle
Set the oracle user as the owner of the Oracle home directory and Oracle installation directory. The oracle user is a member of the oinstall group.
# chown -R oracle:oinstall /home/oracle
# chown -R oracle:oinstall /u01/app/oracle
Create the directory for Oracle Inventory:
# mkdir -p /u01/app/oraInventory
Set the oracle user as the owner for the Oracle Inventory directory:
# chmod -R 775 /u01======================================Installing Oracle Weblogic Server 14c:
Switch to oracle user.
# su - oracle
Edit .bash_profile of oracle user in vim text editor.
$ vi .bash_profile
Add following environment variables in this file.
export ORACLE_BASE=/u01/app/oracle
export ORACLE_HOME=$ORACLE_BASE/product/14.1.1
export MW_HOME=$ORACLE_HOME
export WLS_HOME=$MW_HOME/wlserver
export DOMAIN_BASE=$ORACLE_HOME/user_projects/domains
export DOMAIN_HOME=$DOMAIN_BASE/base_domain
Execute the .bash_profile script to set environment variables for current Linux shell.
$ . ~/.bash_profile
Execute unzip command to extract Weblogic Generic Installer.
$ unzip fmw_14.1.1.0.0_wls_lite_Disk1_1of1.zip
Archive:  fmw_14.1.1.0.0_wls_lite_Disk1_1of1.zip
  inflating: fmw_14.1.1.0.0_wls_lite_generic.jar
Execute the Generic Installer JAR file by using following java command.
$ java -jar fmw_14.1.1.0.0_wls_lite_generic.jar
Launcher log file is /tmp/OraInstall2022-09-25_05-32-40PM/launcher2022-09-25_05-32-40PM.log.
Extracting the installer . . . . . . Done
Checking if CPU speed is above 300 MHz.   Actual 2111.999 MHz    Passed
Checking monitor: must be configured to display at least 256 colors.   Actual 16777216    Passed
Checking swap space: must be greater than 512 MB.   Actual 923 MB    Passed
Checking temp space: must be greater than 300 MB.   Actual 7497 MB    Passed
Preparing to launch the Oracle Universal Installer from /tmp/OraInstall2022-09-25_05-32-40PM
Log: /tmp/OraInstall2022-09-25_05-32-40PM/install2022-09-25_05-32-40PM.log
If you are installing on a Linux server with no graphical support, then you have to configure X11 forwarding by using PuTTY and XMing to get the graphical output at client console.
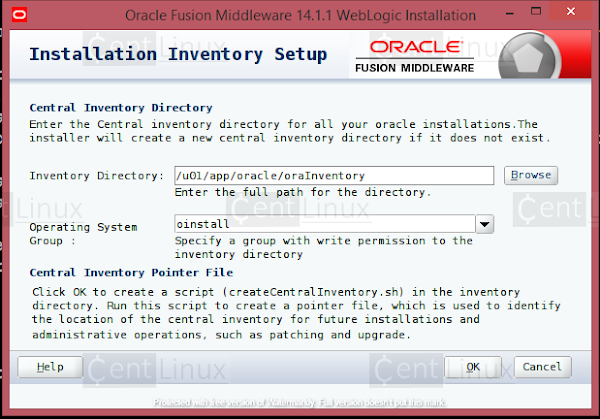
Set the OraInventory directory and click on ‘Next’ button.
You are on the welcome page. Click on ‘Next’.
Select ‘Skip Auto Updates’ and click ‘Next’.
Set the Oracle Home directory here and move to ‘Next’ screen.
Select the components that you want to install on your application server. You can either install Weblogic Server, Coherence or both.
Click on ‘Next’.
Click on ‘Install’ button.
Click on ‘Next’.
Uncheck ‘Automatically Launch the Quickstart Configuration Wizard’ and click on ‘Finish’.
Post-Installation Configurations:
If you are planning to deploy a Fusion Middleware product over your WebLogic application server, then you must skip the configuration step. Because the configurations will be performed by the respective FMW product.
Otherwise, you can configure WebLogic Server by executing following script.
$ /u01/app/oracle/product/14.1.1/oracle_common/common/bin/config.sh
Create a Domain for your Weblogic application server.
Select a template to create the domain. Click ‘Next’.
Set a strong password for Weblogic Server administrative user.
Select the Domain Mode and JDK for your Application Server.
Click on ‘Next’.
Click on ‘Create’.
Click on ‘Next’.
Click on ‘Finish’.
WebLogic Server has been configured successfully.
To grant access of your application server to network clients, allow the default service port of WebLogic server in Linux firewall.
# firewall-cmd --permanent --add-port=7001/tcp
success
# firewall-cmd --reload
success
Whenever you start the Weblogic service, it will always ask you for a username / password.
To automate it, you can define the credentials in boot.properties file.
$ mkdir -p $DOMAIN_HOME/servers/AdminServer/security/
$ echo "username=weblogic" > $DOMAIN_HOME/servers/AdminServer/security/boot.properties
$ echo "password=weblogic123" >> $DOMAIN_HOME/servers/AdminServer/security/boot.properties
Start the Oracle Weblogic Server 14c by executing following script.
$ $DOMAIN_HOME/startWebLogic.sh &
Browse URL https://192.168.1.9:7001/console in a web browser
Login as Administrative user.
You have reached at the Weblogic Administrative Console.


No comments:
Post a Comment